CSAPP lab4 archlab
lab真心难,这一章的体系结构部分还是真心很难,总共分为parta、partb、partc三部分,三部分都还挺难的,parta,partb部分还算比较容易,partc部分真心还是挺难的,需要仔细了解和学习相关知识。自我感觉学习还是非常有成效的,特别是之前做过《from nand to tetris》部分的课程还是有非常大的帮助,通过课程的学习对于体系结构和底层的汇编指令都有了一个初步的入门和学习。
首先需要了解一下y86的指令集如下: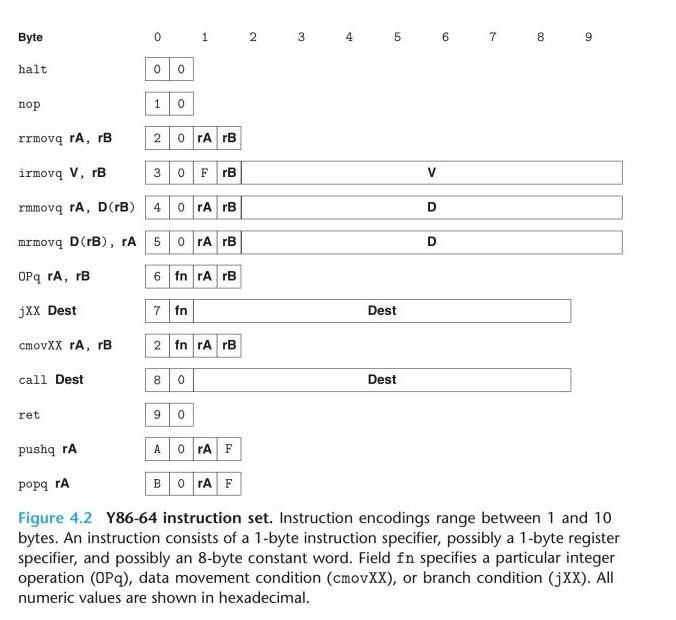
基本上目前教材中已经给出的指令与指令详细的描述和指令字上如上图所示。
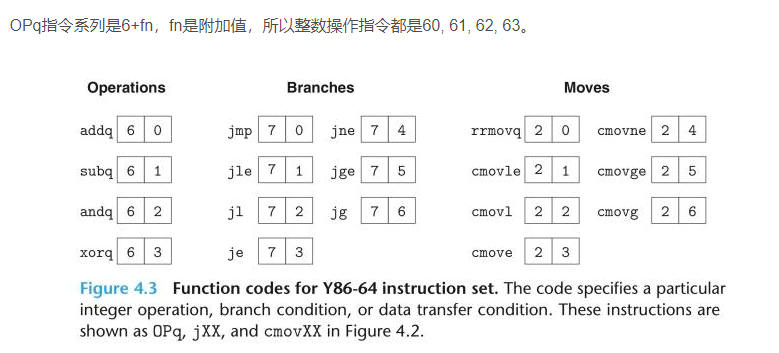
- 有4个整数操作指令。对应表中的OPq,分别是addq, subq, andq, xorq。它们只对寄存器数据操作,同时还会设置条件码。
- 这里有7个跳转指令,就是图中的jXX。根据条件码来设置分支条件并进行跳转,分支条件和X86-64一样。
- 有6个条件传送指令,图示的cmovXX,这些指令格式和寄存器-寄存器传送指令一样,但是只有当条件码满足所需要的约束时,才会更新目的寄存器的值。
- call指令和ret指令同X86-64一致,pushq和popq亦是如此
- halt指令终止程序运行,并将状态码设置为HLT。
其中关于流水线的部分感觉过于晦涩,可以参考CSDN的中文翻译,质量很不错。
处理器体系结构
parta
Write a Y86-64 program sum.ys that iteratively sums the elements of a linked list. Your program should
consist of some code that sets up the stack structure, invokes a function, and then halts. In this case,
the function should be Y86-64 code for a function (sum list) that is functionally equivalent to the C
sum list function in Figure 1. Test your program using the following three-element list:
/* linked list element */ |
针对上述的三个函数sum_list,rsum_list,copy_block这三个函数用y86的汇编实现出来,并完成通过测试用例。
sum_list: 这个函数实现起来非常简单,我们直接用常规的几个指令即可完成,无非是有一个loop和判断条件。运行结果如下:/* $begin code-yso */
/* $begin code-ysa */
# Execution begins at address 0
.pos 0
init: irmovl Stack, %esp # Set up stack pointer
irmovl Stack, %ebp # Set up base pointer
call Main # Execute main program
halt # Terminate program
# Sample linked list
.align 4
ele1:
.long 0x00a
.long ele2
ele2:
.long 0x0b0
.long ele3
ele3:
.long 0xc00
.long 0
Main: pushl %ebp
rrmovl %esp,%ebp
irmovl ele1,%edx
pushl %edx # Push linklist head
call sum_list # Sum(array, 4)
rrmovl %ebp,%esp
popl %ebp
ret
sum_list: pushl %ebp
rrmovl %esp,%ebp
mrmovl 8(%ebp),%ebx
irmovl $0,%eax
irmovl 4,%ecx
Loop: mrmovl (%ebx),%esi
addl %esi,%eax
addl %ecx,%ebx
mrmovl (%ebx),%edx
rrmovl %edx,%ebx
andl %ebx,%ebx
jne Loop
End: rrmovl %ebp,%esp
popl %ebp
ret
.pos 0x200
Stack: # The stack goes here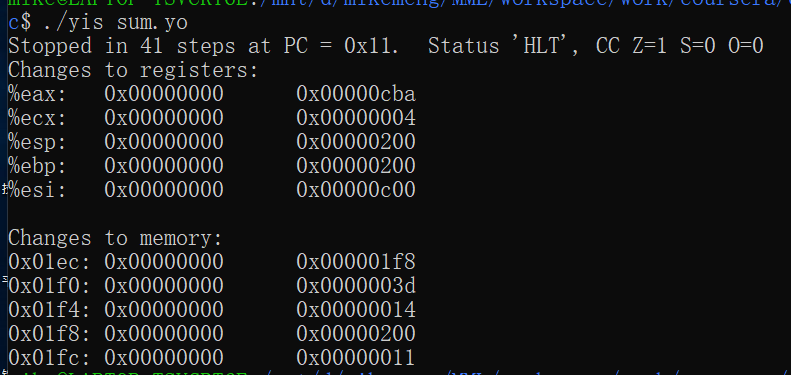
rsum_list: 这个链表遍历是用递归实现的,因此稍微复杂一些,因为用到递归则寄存器esi存在重入的风险,因此此时我们则需要降每次取出的val压入到栈中,待到当前的函数调用结束后,再降其从栈中弹出上一次计算的值,与函数返回的值进行相加即可得到本次函数返回值。运行结果如下:/* $begin code-yso */
/* $begin code-ysa */
# Execution begins at address 0
.pos 0
init: irmovl Stack, %esp # Set up stack pointer
irmovl Stack, %ebp # Set up base pointer
call Main # Execute main program
halt # Terminate program
# Sample linked list
.align 4
ele1:
.long 0x00a
.long ele2
ele2:
.long 0x0b0
.long ele3
ele3:
.long 0xc00
.long 0
Main: pushl %ebp
rrmovl %esp,%ebp
irmovl ele1,%edx
pushl %edx # Push linklist head
call rsum_list # Sum(array, 4)
rrmovl %ebp,%esp
popl %ebp
ret
rsum_list: pushl %ebp
rrmovl %esp,%ebp
mrmovl 8(%ebp),%ebx
xorl %eax,%eax
andl %ebx,%ebx
je End
pushl %esi
mrmovl (%ebx),%esi
mrmovl 4(%ebx),%edx
pushl %edx
call rsum_list
popl %edx
addl %esi,%eax
popl %esi
End: rrmovl %ebp,%esp
popl %ebp
ret
.pos 0x200
Stack: # The stack goes here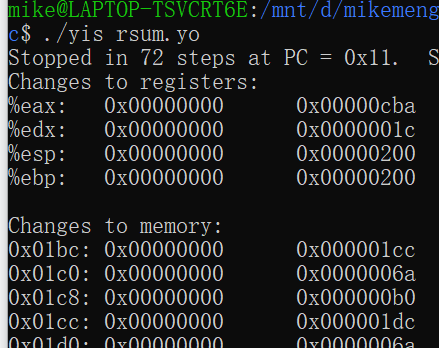
copy_block: 这个就更简单了,就是基本的拷贝和复制,用好几种寻址方式即可。运行结果如下:/* $begin code-yso */
/* $begin code-ysa */
# Execution begins at address 0
.pos 0
init: irmovl Stack, %esp # Set up stack pointer
irmovl Stack, %ebp # Set up base pointer
call Main # Execute main program
halt # Terminate program
# Source block
.align 4
src:
.long 0x00a
.long 0x0b0
.long 0xc00
# Destination block
dest:
.long 0x111
.long 0x222
.long 0x333
Main: pushl %ebp
rrmovl %esp,%ebp
irmovl $3,%edx
pushl %edx # Push linklist head
irmovl dest,%edx
pushl %edx
irmovl src,%edx
pushl %edx
call copy_block # Sum(array, 4)
rrmovl %ebp,%esp
popl %ebp
ret
copy_block: pushl %ebp
rrmovl %esp,%ebp
mrmovl 8(%ebp),%ebx # ebx = src ;
mrmovl 12(%ebp),%ecx # ecx = dst ;
mrmovl 16(%ebp),%edx # edx = len;
xorl %eax,%eax
andl %edx,%edx
jle End
Loop: mrmovl (%ebx),%esi # get src
rmmovl %esi,(%ecx) # dst = src
xorl %esi,%eax # result = result^vald
irmovl $4,%esi
addl %esi,%ebx # dst++
addl %esi,%ecx # src++
irmovl $-1,%esi
addl %esi,%edx # len--
jg Loop
End: rrmovl %ebp,%esp
popl %ebp
ret
.pos 0x200
Stack: # The stack goes here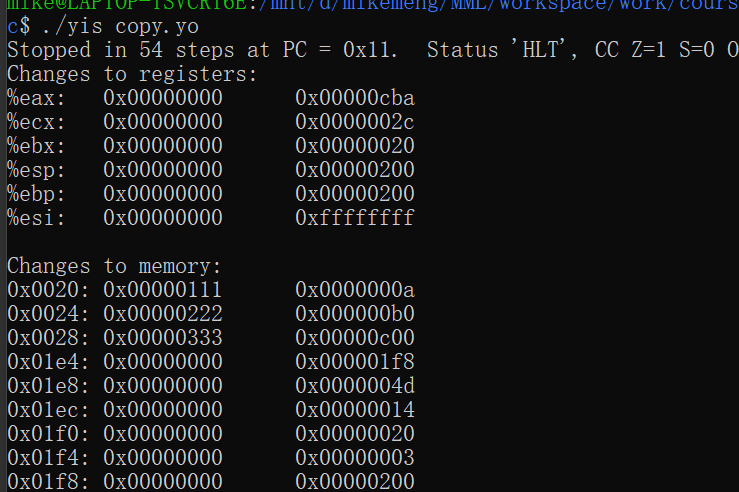
partb
Your task in Part B is to extend the SEQ processor to support the iaddq, described in Homework problems
4.51 and 4.52. To add this instructions, you will modify the file seq-full.hcl, which implements the
version of SEQ described in the CS:APP3e textbook. In addition, it contains declarations of some constants
that you will need for your solution.
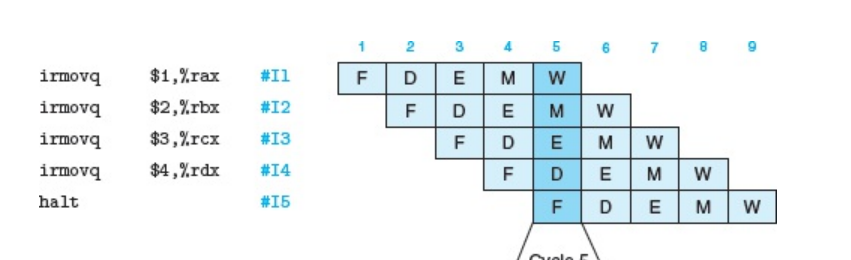
这部分需要你在seq处理器中实现leave和iaddl指令。我们知道按照seq的指令执行过程一般分为:fetch,decode,Execute,Memory,Write back,PC update等几个阶段,每个阶段都需要设置不同的标志位。因为在y86的指令集中为变长指令,所有的指令集都可可能是
iaddl
iaddl指令:即实现立即数与寄存器的值进行相加,结果存储在寄存器中。指令形式如下:指令的翻译过程为:iaddl C,rB
rB = C + rBstage iaddl V,rB fetch icode:ifun ← M1[PC]
rA:rB ← M1[PC + 1]
valC ← M4[PC + 2]
valP ← PC + 6decode valB ← R[rb] Execute valE ← valC + valB Memory Write back r[rb] ← valE PC update PC ← valP
leave:
leave指令的翻译就较为复杂,首先我们来看一下leave指令的实际执行过程首先将当前的基值寄存器中的值写入到栈寄存器,然后将栈顶的数据写入到基质寄存器中,然后栈寄存器加movl %ebp,%esp
popl %ebp4,实际我们可以如下翻译:指令的翻译过程为:%ebp_new = (%esp_odd)
%esp_new = %esp_odd + 4stage leave fetch icode:ifun ← M1[PC]
valP ← PC + 1decode valA ← R[%esp] Execute valE ← 4 + valA Memory valM ← M4[valA] Write back R[%esp] ← valE
R[%ebp] ← valMPC update PC ← valP 即将当前基址寄存器中的数据写入到栈寄存器中,感觉还是挺不容易理解的,对于指令的翻译过程其实蛮有意思的,需要对 HCL语言有基本的熟悉过程即可。就是几个阶段的数据要弄清楚即可,必须寻址阶段的地址非常有必要的学习,还有ALU的使用,写会操作等等。
partc
You will be working in directory sim/pipe in this part.
The ncopy function in Figure 2 copies a len-element integer array src to a non-overlapping dst, returning a count of the number of positive integers contained in src. Figure 3 shows the baseline Y86-64
version of ncopy. The file pipe-full.hcl contains a copy of the HCL code for PIPE, along with a
declaration of the constant value IIADDQ.
Your task in Part C is to modify ncopy.ys and pipe-full.hcl with the goal of making ncopy.ys
run as fast as possible.
You will be handing in two files: pipe-full.hcl and ncopy.ys. Each file should begin with a headerpartc部分需要对ncopy这段程序翻译后的汇编程序进行流水线优化,从而达到加速效果。根据提示,主要优化方法为将循环进行展开,命令即可进行流水线化,从而节省运行时间。目前对于这个程序主要有两部分可以进行优化,一是尽量避免流水线的数据冒险和控制冒险,二是尽量对循环进行展开,从而可以优化指令,减少运行的指令数。本章对于流水线的深度部分讲的原理还是非常深刻的,特别是对于流水线的运行以及加速原理讲的非常浅显易懂,如因为自己并不是处理器架构方面的资深工程师,对这一部分还是有许多很模糊的概念需要弄明白。
- 流水线的基本原理:常规的运行模式我们称之为
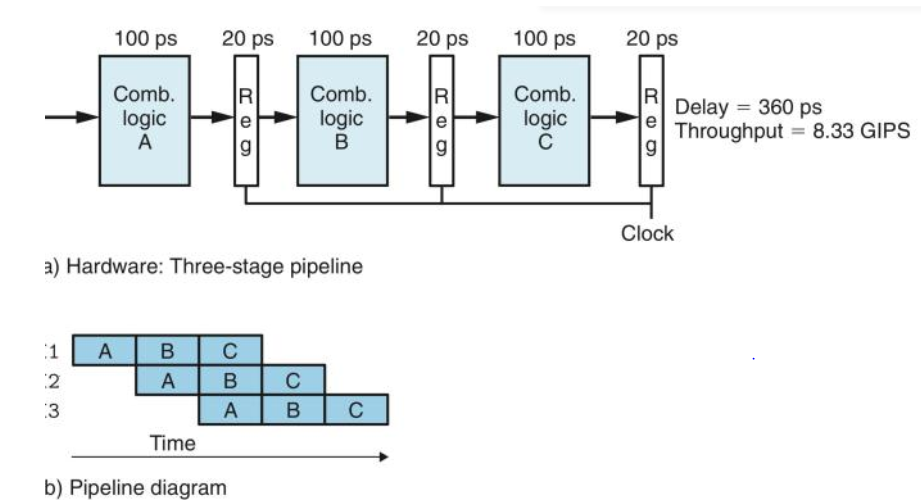
RTC模式(run to complete),即从头开始执行到尾然后再开始下一条指令的执行。经典的rtc模式即每条指令执行完成上述的五个阶段fetch、decode、Execute、Memory、Write back之后,跟新pc后,cpu再开始执行下一条指令。因此每条指令需要等待前一条指令的五个阶段全部执行完成后,才开始进入fetch阶段,而流水线的原理则是利用缓存,每个阶段的计算结果完成后先进入缓冲区,再由缓冲区送入到下一个阶段,这样每当当前的stage的结果送入缓存后,我们即可将下一条指令送入到本次的stage中,具体的每个stage的详细处理细节可以参考章节4.3.4。
RTC模式: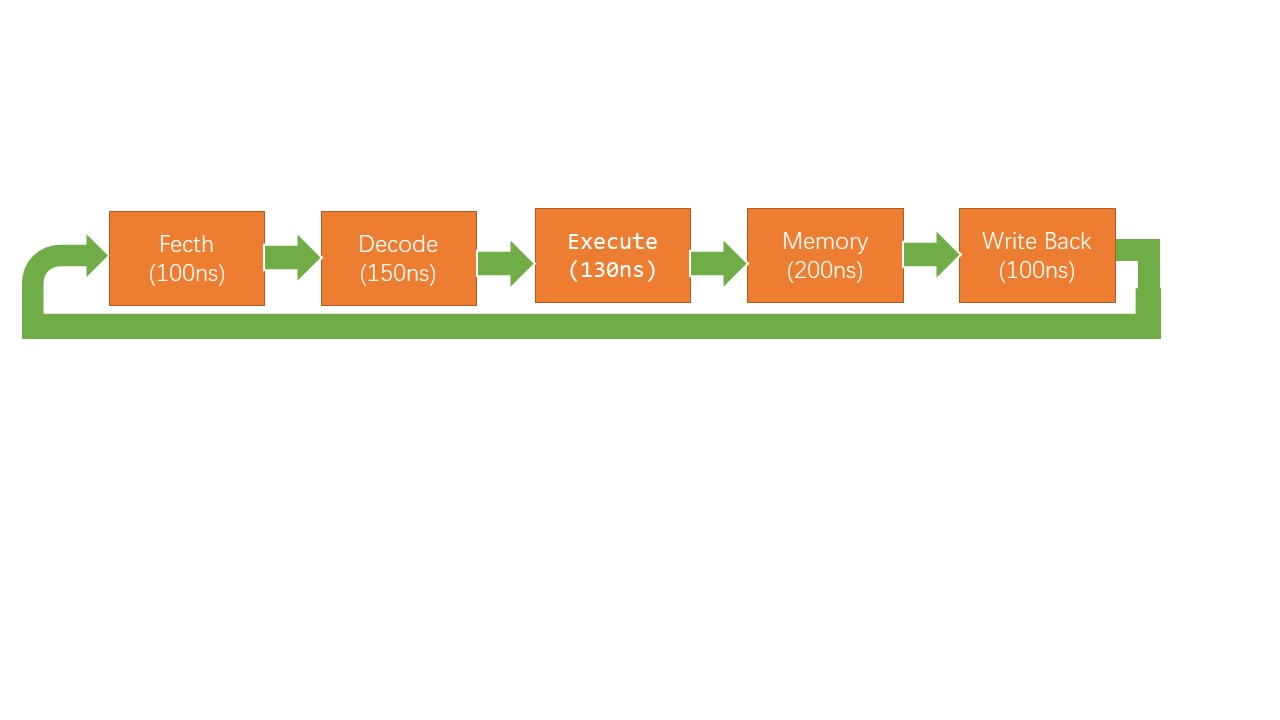
Pipeline模式:
通过在每个stage处都加入缓存即可实现流水线,因为有缓存的存在,此时我们可以将上一个stage的结果临时存放在缓存中,此时当前的stage即可进行下一条指令,待后一个stage完成后,我们将其从缓存中取出临时结果放入到下一个stage中。如果需要实现pipeline则缓存一定是必须的。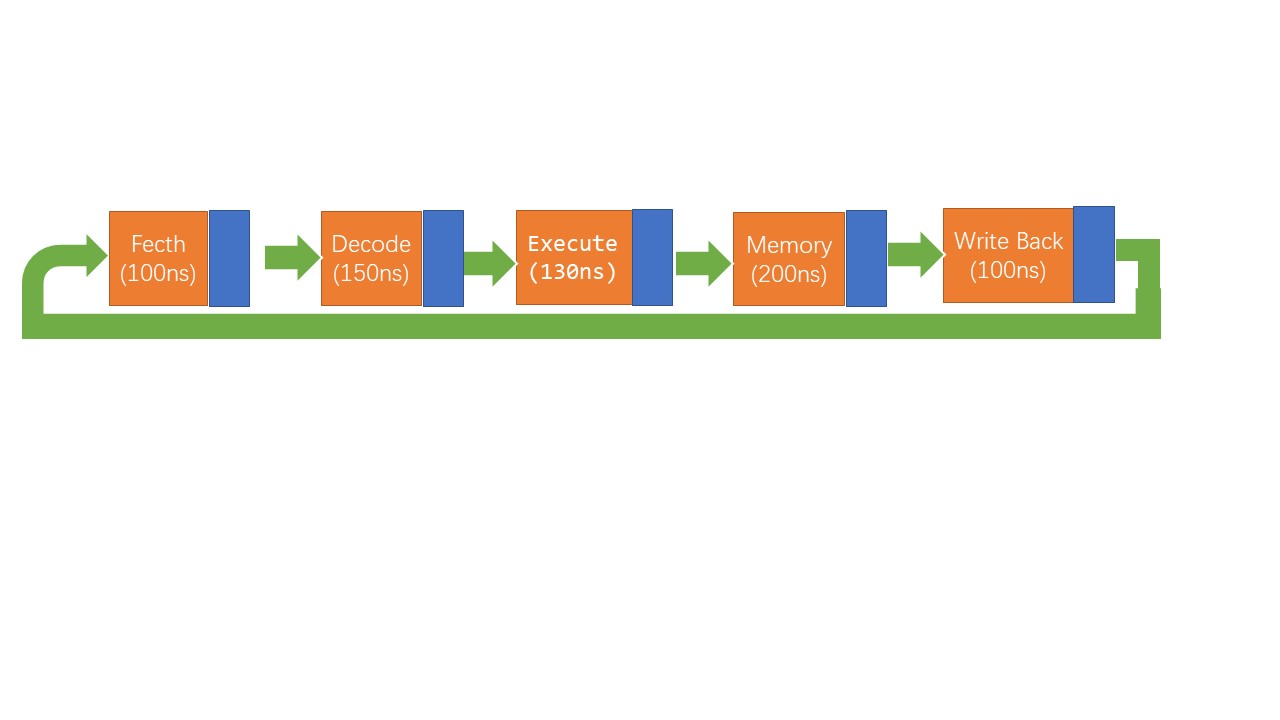
- 流水的加速比的计算:假设每条指令几个阶段
fetch、decode、Execute、Memory、Write back的耗时分别为$t_{0},t_{1},t_{2},t_{3},t_{4}$,则执行一条完整的指令的执行时间为:
$$
T = t_{0} + t_{1} + t_{2} + t_{3} + t_{4} = \sum_{i=0}^{n}t_{i}
$$
如果按照rtc模式的执行的话,如果执行n条指令则需要的总时间为$t = NT$,如果采用流水线时,则如果执行N条指令则需要的总时间约为:
$$
t = (nt_{max}) + (N-1)t_{max}
$$
其中n代表此流水线有n个stage,$t_{max}$代表n个stage中耗时最长的stage.
则加速比的计算公式为:
$$
S = \frac{t_{rtc}}{t_{pipeline}} = \frac{(nt_{max}) + (N-1)t_{max}}{N\sum_{i=0}^{n}t_{i}}
$$
- 流水线的数据冒险:在流水线的实际运行中某些关联指令可能存在问题,比如下一条指令必须用到上一条指令的运算结果,则此时就出现了数据错误,因为下一条指令在
decode阶段时,可能某个寄存器的值还没有在上一个指令中完成更新,则此时计算时肯定存在错误。比如执行以下指令时,如果严格按照执行rrmoveq指令时,此时可能rdx寄存器还未完成跟新,因为第三条在执行decode阶段时,此时第二条指令还在excute阶段,还未到写回阶段,则此时直接读取%rdx寄存器时的值可能是未知的,因此这就意味着风险,此时我们必须将流水线暂停几个stage等待寄存器%rdx完成更新后,我们再执行第三条指令。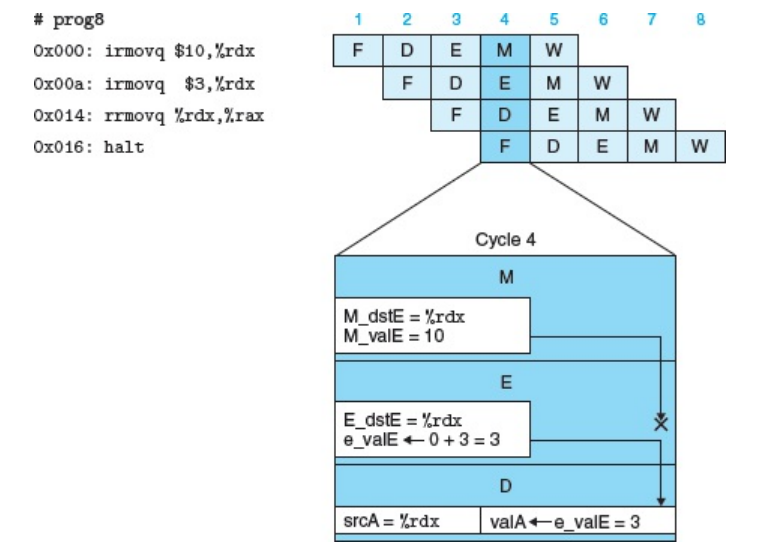
则此时我们需要插入两个空指令等待第二条指令完成写回阶段后,我们即可进行decode阶段。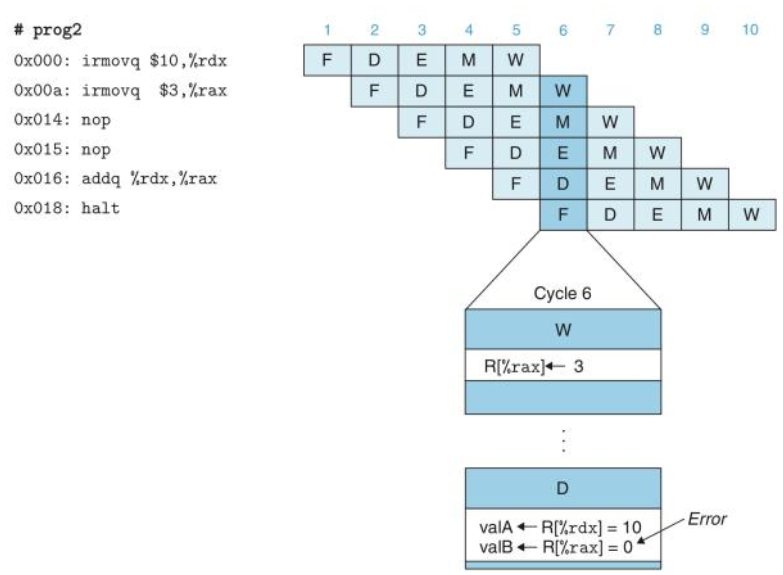
- 流水线的控制冒险:我们知道正常的指令跳转地址为该指令执行完成后,紧挨着的下一条指令,一般情况下我们在取指令阶段即同时预先完成下一条指令地址的更新,但是由于部分指令中存在条件跳转指令,则此时之前在
fectch阶段更新的指令地址可能会失效,我们此时就需要重新填入更新的指令地址,则此时我们需要进行指令取消,即在流水线中中止此时已经执行的指令。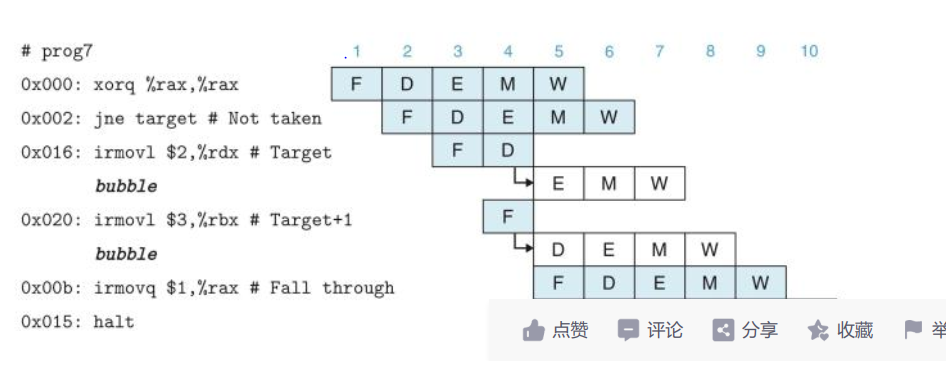
unrolling loop
我们可以参考第5章的优化技术,即对循环进行展开,循环展开的好处有两点,一是可以充分的利用cache,另一方面可以有效的避免数据冒险,即相邻的指令使用同一个寄存器。
对于partc部分,主要针对原有的程序进行了如下优化:
- 对于循环进行展开,每次我们每次读取
4个字节,对每个字节进行分别读取和转存,同时尽可能的避免相邻的指令读取和存储同一个寄存器,从而避免气泡和空指令,从而来加速流水线的执行,由于本课程的工具的限制,本来有15个通用的寄存器,但是不知道为什么它提供的工具竟然不允许用%r8~%r14这5个寄存器。 - 使用
partb部分的iaddl指令,即可以用一条指令完成之前用三条指令实现。 - 感觉本章的许多细节部分还是糊里糊涂,不是特别清楚,只能等待后续有实际的应用场景后再结合实际来研究细节的话,效果才能更好。最终的运行的
##################################################################
# Return the number of positive ints (>0) contained in src.
#
# Include your name and ID here.
#
# Describe how and why you modified the baseline code.
#
##################################################################
# Do not modify this portion
# Function prologue.
ncopy: pushl %ebp # Save old frame pointer
rrmovl %esp,%ebp # Set up new frame pointer
pushl %esi # Save callee-save regs
pushl %ebx
pushl %edi
mrmovl 8(%ebp),%ebx # src
mrmovl 16(%ebp),%edx # len
mrmovl 12(%ebp),%ecx # dst
##################################################################
# You can modify this portion
# Loop header
xorl %eax,%eax # count = 0;
iaddl $-4 , %edx
andl %edx,%edx
jle Remain
Loop:
mrmovl (%ebx),%esi
mrmovl 4(%ebx), %edi
rmmovl %esi, (%ecx) # ...and store it to dst
andl %esi, %esi
jle Nop1
iaddl $1, %eax
Nop1:
rmmovl %edi, 4(%ecx) # ...and store it to dst
andl %edi, %edi
jle Nop2
iaddl $1, %eax
Nop2:
iaddl $-4, %edx
mrmovl 8(%ebx),%esi
mrmovl 12(%ebx), %edi
rmmovl %esi, 8(%ecx) # ...and store it to dst
andl %esi, %esi
jle Nop3
iaddl $1, %eax
Nop3:
rmmovl %edi, 12(%ecx) # ...and store it to dst
andl %edi, %edi
jle Nop4
iaddl $1, %eax
Nop4:
iaddl $16, %ebx
iaddl $16, %ecx
andl %edx,%edx
jg Loop
###############
Remain:
iaddl $4, %edx
andl %edx,%edx
jle Done
Nxloop:
mrmovl (%ebx),%esi
iaddl $4,%ebx
iaddl $-1,%edx
rmmovl %esi, (%ecx) # ...and store it to dst
iaddl $4,%ecx
andl %esi, %esi
jle Nop5
iaddl $1, %eax
Nop5:
andl %edx,%edx
jg Nxloop
##################################################################
# Do not modify the following section of code
# Function epilogue.
Done:
popl %edi # Restore callee-save registers
popl %ebx
popl %esi
rrmovl %ebp, %esp
popl %ebp
ret
##################################################################
# Keep the following label at the end of your function
End:
# /* $end ncopy-ys */bechmark的结果CPE竟然为1.41,感觉不可思议,应该还是部分地方处理有点问题,不过最终的细节还需要后面仔细的考虑和学习,部分细节也没有更多的时间去思考了,不过由于本身自己并不是做处理器加速的,这块的理论需要很深厚的理论基础,当然作为科普了解一下基本的内容和原理来说还是非常不错的。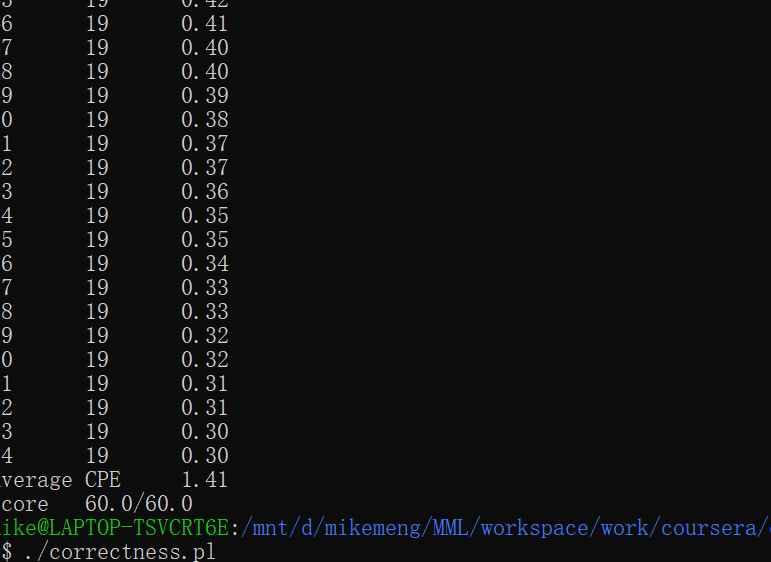
欢迎关注和打赏,感谢支持!
- 关注我的博客: http://mikemeng.org/
- 关注我的知乎:https://www.zhihu.com/people/da-hua-niu
- 关注我的微信公众号: 公务程序猿

扫描二维码,分享此文章