thread
感觉thread lab是我做的基本上最简单的lab了,但是感觉这个章节是干货最多的章节,很多操作系统的原理和技术实现细节就一下子全部很清晰.再配合lab完成现程的实现,感觉对操作系统的进程调度有了一个非常清晰的认识,是非常值得仔细学习和思考的章节.
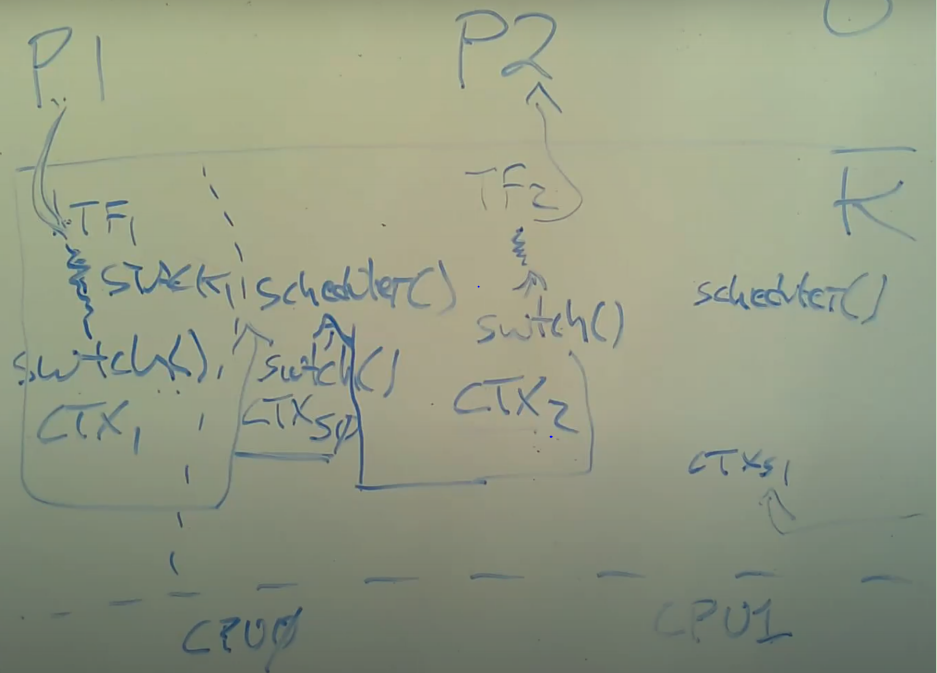
时间片调度的本质: CPU内部有定时器,定时器会定期的发起中断.操作系统内核接收到了定时器中断后,通过
context切换,从当前进程的内核线程切换内核的进程调度程序,而在调度程序内部会实现对进程的调度.我们仔细分析一下源代码可以知道,进程调度工作的流程.在所有的进程中顺序查找到下一个处在就绪态的进程,然后通过切换上下文将该进程的内核线程切换到
CPU中,而该内核线程又通过trapret,cpu恢复到该进程的用户线程.如果当前进程接受到中断时,就会进入usertrap中,在usertrap中检测如果当前为定时器中断,则进行上下文切换切换到内核中的线程调度程序.实际的进程调度分为两种方式,一种方式是时间片到了,当前的进程被动放弃CPU,另一种方式是当前的进程可能需要等待挂起,主动的放弃CPU.void
usertrap(void)
{
int which_dev = 0;
if((r_sstatus() & SSTATUS_SPP) != 0)
panic("usertrap: not from user mode");
// send interrupts and exceptions to kerneltrap(),
// since we're now in the kernel.
w_stvec((uint64)kernelvec);
struct proc *p = myproc();
// save user program counter.
p->trapframe->epc = r_sepc();
if(r_scause() == 8){
// system call
if(p->killed)
exit(-1);
// sepc points to the ecall instruction,
// but we want to return to the next instruction.
p->trapframe->epc += 4;
// an interrupt will change sstatus &c registers,
// so don't enable until done with those registers.
intr_on();
syscall();
} else if((which_dev = devintr()) != 0){
// ok
} else {
printf("usertrap(): unexpected scause %p pid=%d\n", r_scause(), p->pid);
printf(" sepc=%p stval=%p\n", r_sepc(), r_stval());
p->killed = 1;
}
if(p->killed)
exit(-1);
// give up the CPU if this is a timer interrupt.
if(which_dev == 2)
yield();
usertrapret();
}for(;;){
// Avoid deadlock by ensuring that devices can interrupt.
intr_on();
int nproc = 0;
for(p = proc; p < &proc[NPROC]; p++) {
acquire(&p->lock);
if(p->state != UNUSED) {
nproc++;
}
if(p->state == RUNNABLE) {
// Switch to chosen process. It is the process's job
// to release its lock and then reacquire it
// before jumping back to us.
p->state = RUNNING;
c->proc = p;
swtch(&c->context, &p->context);
// Process is done running for now.
// It should have changed its p->state before coming back.
c->proc = 0;
}
release(&p->lock);
}
if(nproc <= 2) { // only init and sh exist
intr_on();
asm volatile("wfi");
}
}进程调度的实现原理: 在
xv6系统中,进程调度直接顺序查找即可,当然找到下一个线程需要$O(n)$的时间复杂度,在实际的Linux系统中,线程都带有优先级,在做线程切换时,可以利用堆的特性,在 $O(\lg n)$ 的时间复杂度内即可将优先级最高的线程且处于就绪态的线程找出来.上下文切换的本质: 本质即为切换寄存器的值.将程序运行过程中的
ra以及sp以及几个常用的由callee保存的寄存器进行保存相关的值即可..globl swtch
swtch:
sd ra, 0(a0)
sd sp, 8(a0)
sd s0, 16(a0)
sd s1, 24(a0)
sd s2, 32(a0)
sd s3, 40(a0)
sd s4, 48(a0)
sd s5, 56(a0)
sd s6, 64(a0)
sd s7, 72(a0)
sd s8, 80(a0)
sd s9, 88(a0)
sd s10, 96(a0)
sd s11, 104(a0)
ld ra, 0(a1)
ld sp, 8(a1)
ld s0, 16(a1)
ld s1, 24(a1)
ld s2, 32(a1)
ld s3, 40(a1)
ld s4, 48(a1)
ld s5, 56(a1)
ld s6, 64(a1)
ld s7, 72(a1)
ld s8, 80(a1)
ld s9, 88(a1)
ld s10, 96(a1)
ld s11, 104(a1)
ret本章还讲述了
spin lock的实现原理,感觉非常清晰明了.首先我们需要知道CPU支持的原子操作,一般使用编译器自带的几个通用的原子操作如下,具体可以参考gcc的文档:Gcc手册中《Using the GNU Compiler Collection (GCC)》.
type __sync_fetch_and_add (type *ptr, type value, ...) |
典型的
spin lock的实现,仔细分析一下源代码:acquire期间会关闭中断,这是为了防止死锁.并同时将计数加1.release时,将计数减1,同时会恢复中断.
- 我们会一直等待
lk->locked变为0,如果lk->locked为1则会一直等待,lk->locked为0,则我们会继续进程到下一步.
- 我们会一直等待
- 从自旋锁的实现方式上来看,我们可以看到自旋锁的资源的消耗还是非常大的,这就需要我们谨慎的使用锁.
// Acquire the lock.
// Loops (spins) until the lock is acquired.
void
acquire(struct spinlock *lk)
{
  push_off(); // disable interrupts to avoid deadlock.
  if(holding(lk))
    panic("acquire");

  // On RISC-V, sync_lock_test_and_set turns into an atomic swap:
  //   a5 = 1
  //   s1 = &lk->locked
  //   amoswap.w.aq a5, a5, (s1)
  while(__sync_lock_test_and_set(&lk->locked, 1) != 0)
    ;

  // Tell the C compiler and the processor to not move loads or stores
  // past this point, to ensure that the critical section's memory
  // references happen strictly after the lock is acquired.
  // On RISC-V, this emits a fence instruction.
  __sync_synchronize();

  // Record info about lock acquisition for holding() and debugging.
  lk->cpu = mycpu();
}

void
release(struct spinlock *lk)
{
  if(!holding(lk))
    panic("release");

  lk->cpu = 0;

  // Tell the C compiler and the CPU to not move loads or stores
  // past this point, to ensure that all the stores in the critical
  // section are visible to other CPUs before the lock is released,
  // and that loads in the critical section occur strictly before
  // the lock is released.
  // On RISC-V, this emits a fence instruction.
  __sync_synchronize();

  // Release the lock, equivalent to lk->locked = 0.
  // This code doesn't use a C assignment, since the C standard
  // implies that an assignment might be implemented with
  // multiple store instructions.
  // On RISC-V, sync_lock_release turns into an atomic swap:
  //   s1 = &lk->locked
  //   amoswap.w zero, zero, (s1)
  __sync_lock_release(&lk->locked);

  pop_off();
}

// Check whether this cpu is holding the lock.
// Interrupts must be off.
int
holding(struct spinlock *lk)
{
  int r;
  r = (lk->locked && lk->cpu == mycpu());
  return r;
}

// push_off/pop_off are like intr_off()/intr_on() except that they are matched:
// it takes two pop_off()s to undo two push_off()s.  Also, if interrupts
// are initially off, then push_off, pop_off leaves them off.

void
push_off(void)
{
  int old = intr_get();

  intr_off();
  if(mycpu()->noff == 0)
    mycpu()->intena = old;
  mycpu()->noff += 1;
}

void
pop_off(void)
{
  struct cpu *c = mycpu();
  if(intr_get())
    panic("pop_off - interruptible");
  if(c->noff < 1)
    panic("pop_off");
  c->noff -= 1;
  if(c->noff == 0 && c->intena)
    intr_on();
}
- 从自旋锁的实现方式上来看,我们可以看到自旋锁的资源的消耗还是非常大的,这就需要我们谨慎的使用锁.
线程的切换:在XV6中,任何时候都需要经历:
- 从一个用户进程切换到另一个用户进程,都需要从第一个用户进程接入到内核中,保存
用户进程的状态并运行第一个用户进程的内核线程。 - 再从第一个用户进程的内核线程切换到第二个用户进程的内核线程。
- 之后,第二个用户进程的内核线程暂停自己,并恢复第二个用户进程的用户寄存器。
- 最后返回到第二个用户进程继续执行。
实现代码
本次lab的几个程序倒是非常简单.
git repo
Uthread: switching between threads
Your job is to come up with a plan to create threads and save/restore registers to switch between threads, and implement that plan. When you're done, make grade should say that your solution passes the uthread test. |
实现几个基本线程的切换:上下文切换这部分最难,但是我们可以直接可以参考switch.S的实现,直接copy过来即可.关于线程切换时.每个线程都有独立的栈,我们在初始化线程时,会将线程的上下文中sp和ra进行初始化,分别指向当前线程的栈的高位地址,返回地址则指向线程的起始函数地址.
- 最坑的一个
bug是: 线程的栈的地址是从高地址向低地址增长,刚开始没有发现这个问题,直接将低地址赋给$sp$,然后总是出错.莫名奇妙的会改写线程的状态,总是找不到原因,最终查看,由于栈的地址是从高往低增长,我们在对栈进行操作时会覆盖掉$thread$结构体中的其他信息和内容. - 关于线程的定义:
struct context {
  uint64 ra;
  uint64 sp;

  // callee-saved
  uint64 s0;
  uint64 s1;
  uint64 s2;
  uint64 s3;
  uint64 s4;
  uint64 s5;
  uint64 s6;
  uint64 s7;
  uint64 s8;
  uint64 s9;
  uint64 s10;
  uint64 s11;
};

struct thread {
  char       stack[STACK_SIZE]; /* the thread's stack */
  int        state;             /* FREE, RUNNING, RUNNABLE */
  struct context context;       /* thread context */
};
- thread_switch定义:
.globl thread_switch
thread_switch:

	/* YOUR CODE HERE */
	sd ra, 0(a0)
    sd sp, 8(a0)
    sd s0, 16(a0)
    sd s1, 24(a0)
    sd s2, 32(a0)
    sd s3, 40(a0)
    sd s4, 48(a0)
    sd s5, 56(a0)
    sd s6, 64(a0)
    sd s7, 72(a0)
    sd s8, 80(a0)
    sd s9, 88(a0)
    sd s10, 96(a0)
    sd s11, 104(a0)

    ld ra, 0(a1)
    ld sp, 8(a1)
    ld s0, 16(a1)
    ld s1, 24(a1)
    ld s2, 32(a1)
    ld s3, 40(a1)
    ld s4, 48(a1)
    ld s5, 56(a1)
    ld s6, 64(a1)
    ld s7, 72(a1)
    ld s8, 80(a1)
    ld s9, 88(a1)
    ld s10, 96(a1)
    ld s11, 104(a1)

ret /* return to ra */ - 线程初始化:
void
thread_create(void (*func)())
{
  struct thread *t;

  for (t = all_thread; t < all_thread + MAX_THREAD; t++) {
    if (t->state == FREE) break;
  }
  t->state = RUNNABLE;

  // YOUR CODE HERE
  memset(&t->context,0,sizeof(struct context));
  t->context.ra = (uint64)func;
  t->context.sp = (uint64)t->stack + STACK_SIZE;
} - 线程调度与切换:
void
thread_schedule(void)
{
  struct thread *t, *next_thread;

  /* Find another runnable thread. */
  next_thread = 0;
  t = current_thread + 1;
  for(int i = 0; i < MAX_THREAD; i++){
    if(t >= all_thread + MAX_THREAD)
      t = all_thread;
    if(t->state == RUNNABLE) {
      next_thread = t;
      break;
    }
    t = t + 1;
  }

  if (next_thread == 0) {
    printf("thread_schedule: no runnable threads\n");
    exit(-1);
  }

  if (current_thread != next_thread) {         /* switch threads?  */
    next_thread->state = RUNNING;
    t = current_thread;
    current_thread = next_thread;
    /* YOUR CODE HERE
     * Invoke thread_switch to switch from t to next_thread:
     * thread_switch(??, ??);
     */
    thread_switch((uint64)&t->context,(uint64)&next_thread->context);
  } else
     next_thread = 0;
}
Using threads
In this assignment you will explore parallel programming with threads and locks using a hash table. You should do this assignment on a real Linux or MacOS computer (not xv6, not qemu) that has multiple cores. Most recent laptops have multicore processors. |
在多线程下,多个线程同时更新和查找
hash table,会出现数据竞争的问题,如何去解决该问题?很明显就是加锁,在更新hash table时加锁,防止两个线程同时更新hash tbale即可.代码实现:
static
void put(int key, int value)
{
  int i = key % NBUCKET;

  // is the key already present?
  struct entry *e = 0;
  for (e = table[i]; e != 0; e = e->next) {
    if (e->key == key)
      break;
  }

  pthread_mutex_lock(&lock);
  if(e){
    // update the existing key.
    e->value = value;
  } else {
    // the new is new.
    insert(key, value, &table[i], table[i]);
  }
  pthread_mutex_unlock(&lock);
}
Barrier
In this assignment you'll implement a barrier: a point in an application at which all participating threads must wait until all other participating threads reach that point too. You'll use pthread condition variables, which are a sequence coordination technique similar to xv6's sleep and wakeup. |
题目中用了多个线程的同步,实际上利用了条件变量
cond,这个与C++中的条件变量实现原理类似condition_variable, 可以参考pthread_cond_wait与pthread_cond_timedwait的用法.cond- 阻塞功能: 必须和一个互斥锁配合,以防止多个线程同时请求
pthread_cond_wait()(或pthread_cond_timedwait(),下同)的竞争条件(Race Condition)。mutex互斥锁必须是普通锁(PTHREAD_MUTEX_TIMED_NP)或者适应锁(PTHREAD_MUTEX_ADAPTIVE_NP),且在调用pthread_cond_wait()前必须由本线程加锁(pthread_mutex_lock()),而在更新条件等待队列以前,mutex保持锁定状态,并在线程挂起进入等待前解锁。在条件满足从而离开pthread_cond_wait()之前,mutex将被重新加锁,以与进入pthread_cond_wait()前的加锁动作对应。阻塞时处于解锁状态。
- 阻塞功能: 必须和一个互斥锁配合,以防止多个线程同时请求
- pthread_cond_wait进入阻塞时,则会释放锁,从而别的线程可以获取到该锁;当
pthread_cond_wait被唤醒时,则又会加锁,因此当它唤醒后,还需要释放锁的操作.
- pthread_cond_wait进入阻塞时,则会释放锁,从而别的线程可以获取到该锁;当
- 在条件满足从而离开pthread_cond_wait()之前,mutex将被重新加锁,以与进入pthread_cond_wait()前的加锁动作对应
- 激活功能: 激发条件有两种形式,
pthread_cond_signal()激活一个等待该条件的线程,存在多个等待线程时按入队顺序激活其中一个;而pthread_cond_broadcast()则激活所有等待线程。
- 激活功能: 激发条件有两种形式,
重要函数的使用说明: 使用
pthread_mutex_lock(&mutex1);加互斥所,然后在pthread_cond_wait(&cond, &mutex1);这样可以保证这期间没有pthread_cond_broadcast或者pthread_cond_signal操作,从而保证条件不会丢失,当pthread_cond_wait(&cond, &mutex1);
pthread_cond_wait(&cond, &mutex); // go to sleep on cond, releasing lock mutex, acquiring upon wake up |
static void |
思考总结
- 通过这一章几个重要的原理讲解,非常清晰的了解操作系统进程调度的第层实现原理与锁的实现原理.
- 通过学习
pthread_cond_wait的原理从而能够学习c++中conditional_variable的原理. - 下一步计划:
- 完成
option chanllenge的project;
- 完成
- 学习
conditional_variable的实现原理;
- 学习
- 阅读
pthread_cond_wait的源代码.
- 阅读
欢迎关注和打赏,感谢支持!
- 关注我的博客: http://mikemeng.org/
- 关注我的知乎:https://www.zhihu.com/people/da-hua-niu
- 关注我的微信公众号: 公务程序猿

扫描二维码,分享此文章